

Attach a photo, document, or image in the app's chat 📲
Here's how to attach photos, documents, or images in the chat on the "Munily" app:
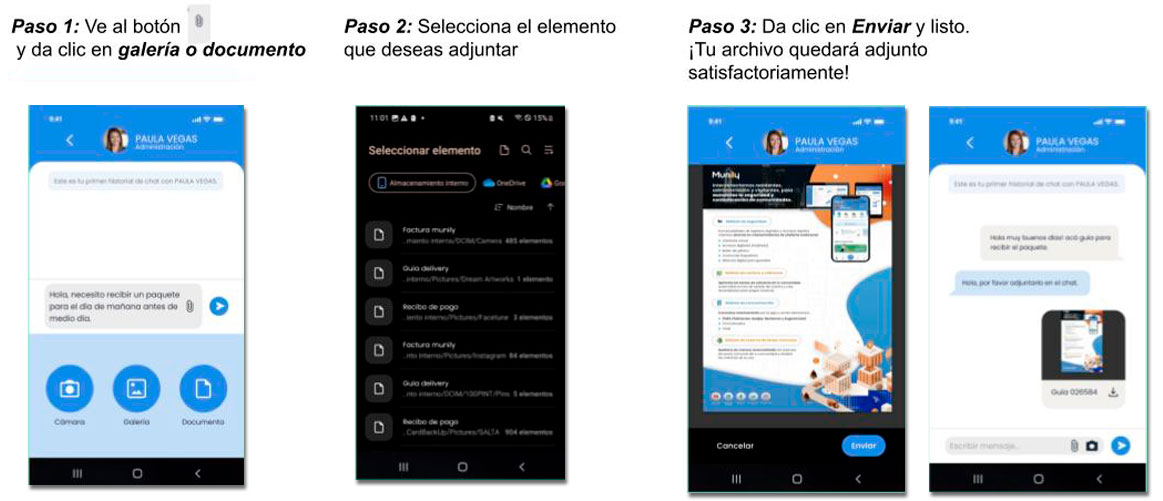
Step 1: Go to the button and click on "Gallery" or "Document"
On the main chat screen, you’ll see three icons at the bottom: a camera, a gallery icon, and a document icon.
- Camera: To take a new photo.
- Gallery: To select a photo or image already on your device.
- Document: To attach a document file (PDF, Word, etc.).
Select the icon that corresponds to the type of file you want to attach.
Step 2: Select the item you want to attach
Once you’ve selected “Gallery” or “Document,” a new screen will open where you can browse the files on your device.
You’ll see options such as “Internal Storage,” “OneDrive,” “Google Drive,” and others, depending on the storage apps you have installed.
Below these options, your files and folders will be listed. Look for the specific file you want to attach. For example, you might see entries such as “Municipal bill,” “Delivery slip,” “Payment receipt,” etc.
Click on the desired file to select it.
Step 3: Click Send, and you’re done. Your file will be successfully attached!
After selecting the file, the app will show you a preview of it. At the bottom of this preview, you’ll find two buttons:
- Cancel: If you want to discard the selection and go back.
- Send: To confirm and attach the file to the chat.
Click the Send button. Your file will upload and appear in the chat history, ready for the property management to view.
Guide images
Still need help? Reach us on WhatsApp or at soporte@munily.com.
Con Amor 💙 Munily