

Is your building part of a master association? 🏘️
Here’s how to register and edit users on Munily to manage your master association.
Register a New User
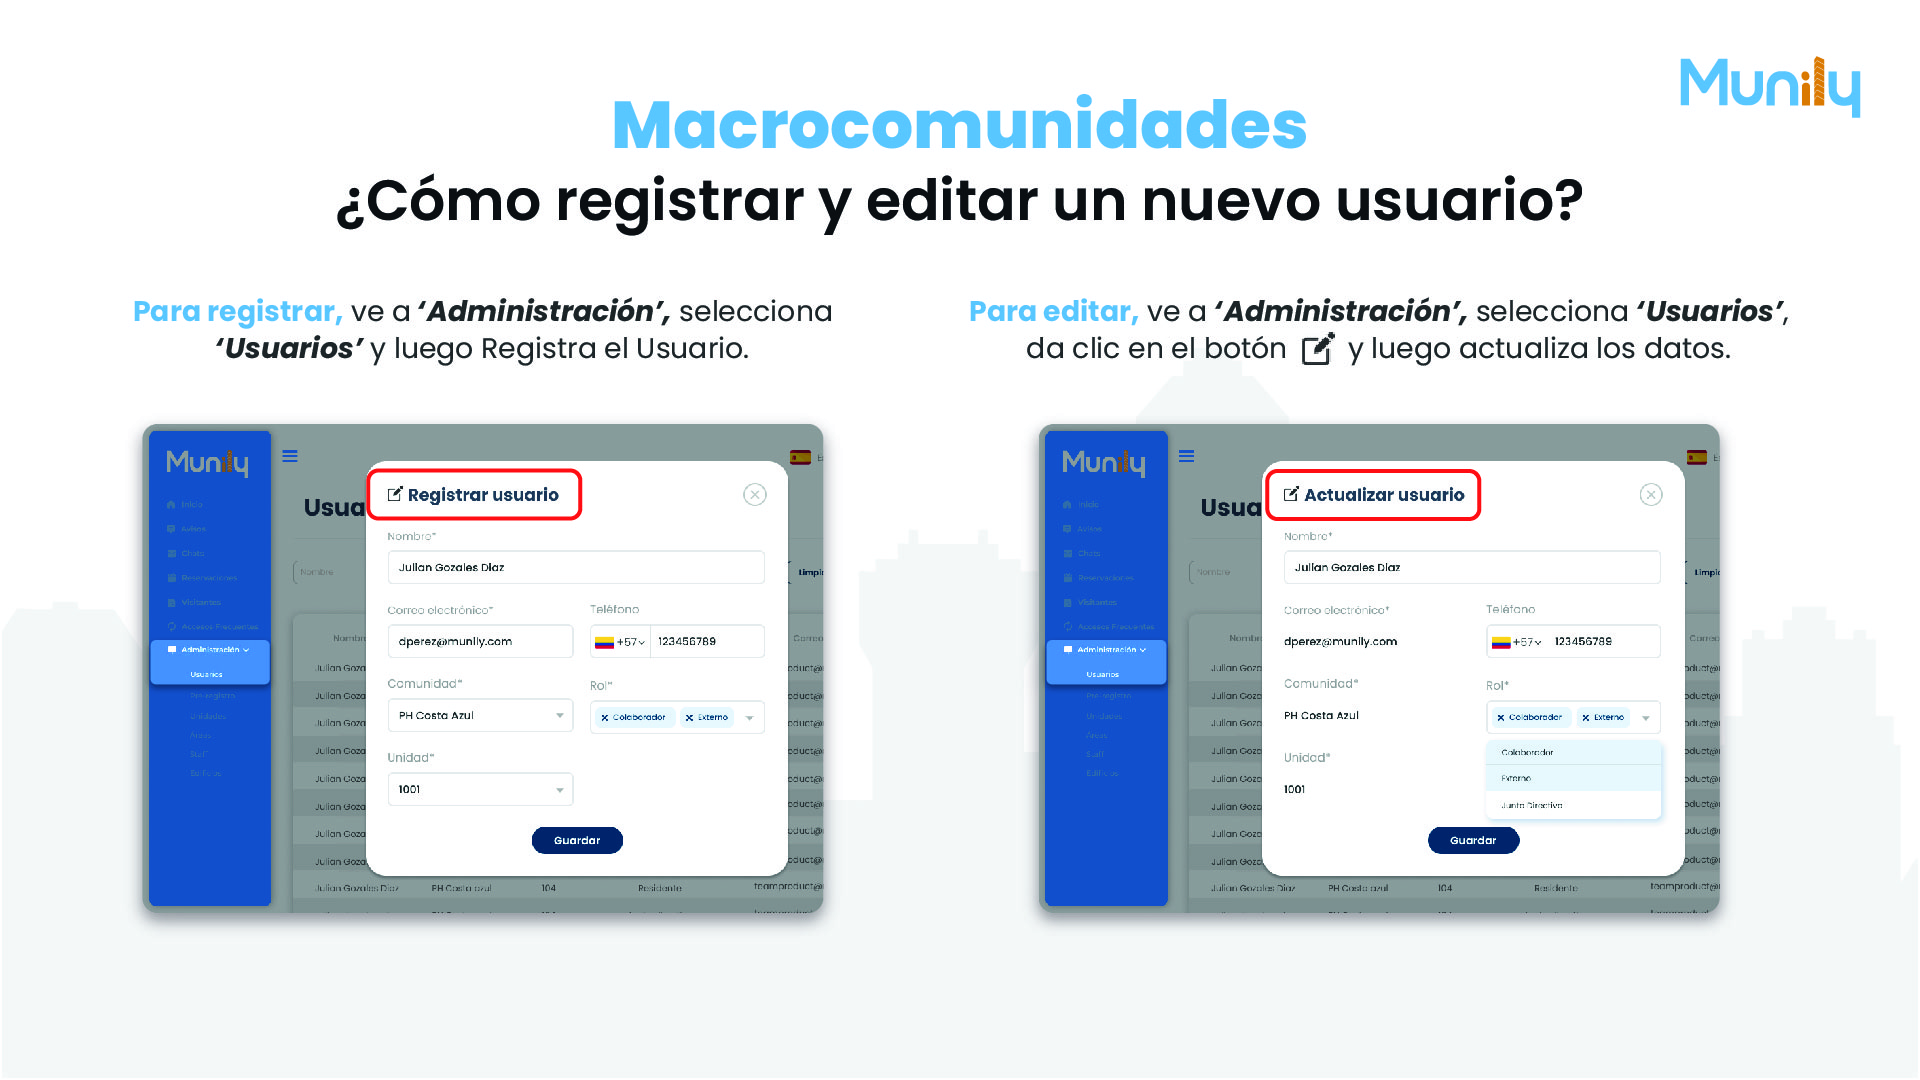
To register a new user, follow these steps:
- In the left-hand side menu, click Administración (Administration).
- Under the “Administración” options, select Usuarios (Users).
- You’ll see a form titled Register User.
- Fill out the following fields:
- Name: Enter the user’s full name.
- Email: Enter the user’s email address.
- Phone: Enter the user’s phone number, including the country code.
- Community: Select the community to which the user belongs.
- Unit: Specify the specific unit within the community.
- Role: Choose the user’s role (for example, Contributor, External).
- Once all the information is complete, click the Save button.
Edit an Existing User
If you need to edit the information for a user who is already registered, follow these steps:
- Go to the left-hand side menu and click Administración.
- Select Usuarios.
- In the list of users, find the user you want to edit.
- Click the button with the pencil icon (✏️) that appears next to the user’s name. This will open a form titled Update User.
- Edit the necessary information in the corresponding fields:
- Name
- Phone
- Community
- Unit
- Role
- After making your changes, click the Save button to apply the updates.
Hello! At Munily, we help you manage the amenities of your building or residential community. Below, we’ll explain how you can make a reservation and approve the use of these amenities.
How do I make a reservation for amenities?
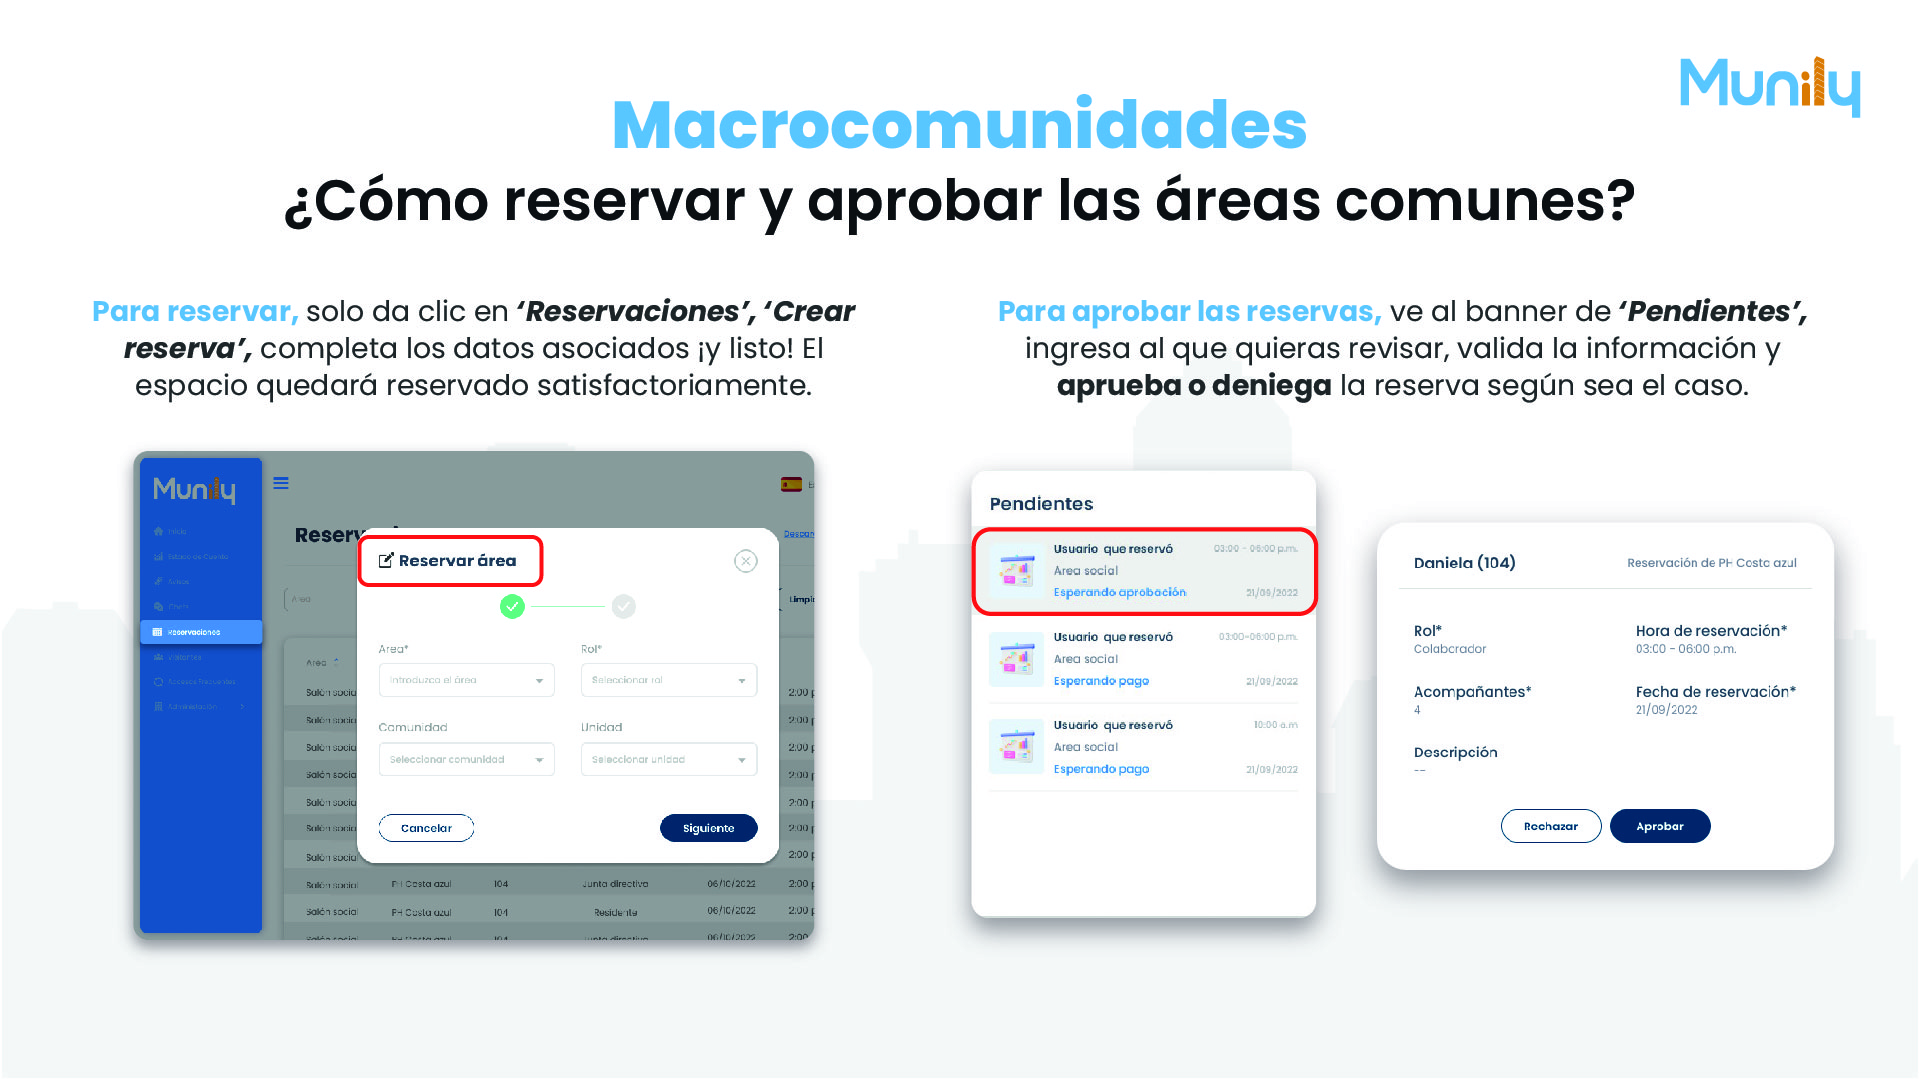
To make a reservation, follow these steps:
- In the left-hand side menu, click "Reservaciones (Reservations)".
- You’ll see an option that says "Reservation for Area". Click it.
- A form will appear. Fill in the following information:
- Area: Select the amenity you want to reserve.
- Role: Choose the role associated with your reservation.
- Community: Select the community you belong to.
- Unit: Specify the unit you’re using for the reservation.
- Once you’ve filled in the details, click the "Next" button.
- The space will be successfully reserved.
How do I approve or deny amenity reservations?
If you are an administrator or have permissions to approve reservations, follow these steps:
- In the "Pending" section, you’ll see a banner listing the reservations that require your attention.
- Click on the reservation you want to review.
- Detailed reservation information will be displayed, including:
- Name of the user who made the reservation.
- Reserved area.
- Reservation time.
- Reservation date.
- Role.
- Number of guests.
- Description (if applicable).
- You’ll be able to see the reservation’s status, such as "Pending Approval" or "Pending Payment".
- Depending on your decision, you can "Approve" or "Reject" the reservation.
Managing amenities with Munily is that easy!
Here’s how to register a new amenity in your building or residential community:
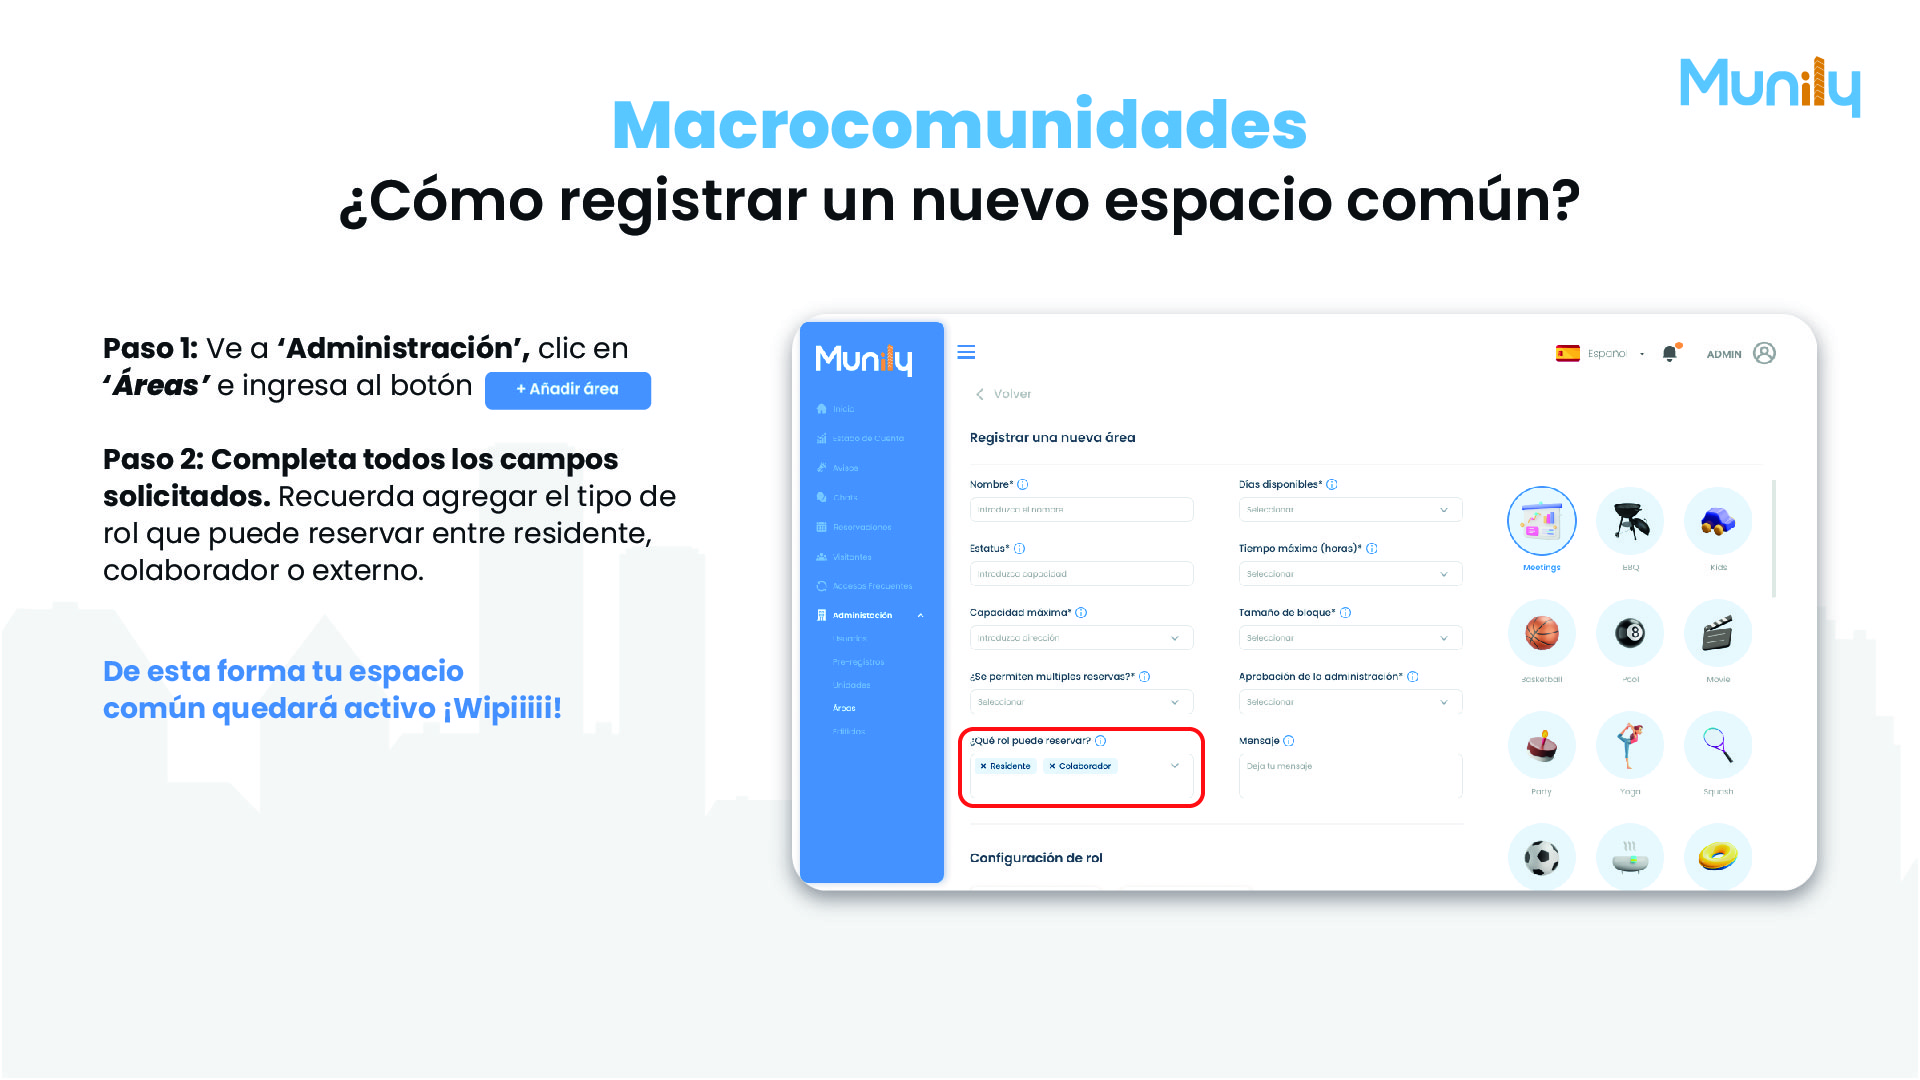
Step 1: Go to the “Áreas (Areas)” section
- Go to the “Administración” option in the main menu.
- Under “Administración,” click “Áreas”.
- Next, select the '+ Add Area' button.
Step 2: Fill in the information for the new space
Once you’ve clicked '+ Add Area', a form will appear. You’ll need to fill in all the required fields.
- Name: Enter the name of the shared amenity (for example, “Event Hall,” “Gym,” “Pool”).
- Status: Select the current status of the area.
- Maximum Capacity: Specify the maximum number of people who can use the space.
- Are Multiple Reservations Allowed?: Decide whether multiple reservations can be made simultaneously for this space.
- Available Days: Select the days of the week when the space will be available for reservations.
- Maximum Duration (hours): Set the maximum allowed duration for each reservation.
- Block size: Specifies the time interval in which reservations can be made (e.g., 1 hour, 2 hours).
- Property management approval: Choose whether reservations for this space require approval from the property management team.
- Message: You can leave a message or additional instructions for users who wish to make a reservation for this space.
Role Settings:
It is essential that in this step you define "Which roles can make a reservation?". Here, you can select from the following options:
- Resident: Allows residents of the complex to make reservations for the space.
- Staff: Allows staff members (e.g., maintenance or property management personnel) to make reservations for the space.
- External: Allows people outside the residential community to make a reservation for the space (if applicable).
You can select one or more roles depending on your needs.
Icon Selection:
On the right side of the screen, you’ll find a variety of icons representing different types of amenities. Select the icon that best describes your new space (for example, a calendar for a meeting room, a grill for a BBQ area, a basketball for a court, etc.).
Once you’ve filled out all the fields and selected the role and icon, your common space will be active and ready for a reservation. Yay!
Guide images
Still need help? Reach us on WhatsApp or at soporte@munily.com.
Con Amor 💙 Munily